Tuesday, August 18, 2020

Vader

 I haven't had a chance to work with LEGO for a while, but I finally got around to building my Darth Vader picture.
 
 This is a similar technique I used when making the Volition logo.  These are clear LEGO plates and studs layered on top of each other to make different shades of gray.  Up close, it looks like a jumble of bricks.
 

I tried to introduce some shades of blue with this build, but I found that I could not control the color as well as I could control the amount of gray.  In the end, I couldn't stand looking at the blue and just went back to black and white. 

Based on the photograph by Stefano Buttafoco


Hopefully soon I can get back to some of my other LEGO projects and get some new write ups with plans.

Tuesday, March 27, 2018

Awesome Bricks Vol. 2

It's about time I got back to building!  Let's go back to a time of mix tapes and awesome music.

This is an alternate build of the Creator Highway Speedster (31006).
LEGO Highway Speedster 31006
 I've had this set for a while, but I didn't really know what to do with it.  A recent contest over at Rebrickable.com convinced me to get building.  You can go HERE to give my entry a like.

My primary goal here was to do something interesting with the wheels that was not building a car.  When I saw that the windows would be the perfect size for a cassette tape, I knew I had to try to make it work.

The wheels sit loose in the housing.  They can be turned and wiggle around a little like they do in a cassette tape.


The entire build is thicker and more open than I would like it to be.  This is due to making the wheels fit and working within a limited part pool.
The back has less detail, but I feel like it still turned out ok.  It still feels complete.

This build really worked for me.  The way the wheels are used is fun and I think the build is very recognizable (for those of us that remember cassette tapes).

Build instructions can be found HERE.

Tuesday, December 15, 2015

The Wars of the Star

I have to admit that I am more excited about the upcoming Star Wars movie than a grown man should be.  The music hits me and I see the X-wings blast across the screen followed by the flash and hum of a lightsaber and I'm just a kid again.

I used to rifle through my box of LEGO to cobble together my own fleet of ships.  I would use mismatched reds and blues to build my fighters.  It would look more like a backwards bi-plane than an X-wing, but it was plenty good enough to woosh around my room and have my own pretend space battles.

This build is dedicated to my younger, spaceship wooshing self.  Here is my X-wing versus Tie Fighter battle.

 This is built from the LEGO Star Wars Rebels Ghost (75053).
http://shop.lego.com/en-US/The-Ghost-75053

 I've been pretty happy with the Star Wars Rebels TV series so far.  The characters are interesting and it feels like it belongs in the Star Wars universe.  If you have been considering watching, I would recommend it.

The Ghost as a LEGO model is also pretty nice.  It has a strong Technic base with some interesting construction to get those angled panels.  Just don't go in expecting the Millennium Falcon.  There really isn't any interior to speak of.  Also, you should purchase The Phantom with this as the back has a dedicated area to dock the Phantom and it looks like there is something missing without it.  On the other hand, the Phantom and the Ghost are supposed to be different scales, so they always look a little strange to me when they are together.

On to the build.  First up is the X-Wing:

The wings are adjustable, but there is nothing holding them in place. The wings can also be closed, but they don't close flat against each other.

Still, this is totally swooshable.  (I know. I did some swooshing.) There is even some detail on the back with its 4 engines burning it along.

The Tie Fighter is modeled with the white wings and the dark outlines after the ones in the new movie.

There is a limit of the amount of detail I can give to the wing patterns.  It's not perfect, but it seems to do ok.

The cockpit is larger than it should be in comparison to the wings.  This gives it a bit of a super-deformed look, but it turns out that it is still totally wooshable.   (It has been wooshed several times.)

Finally, I made some stands for these guys to sit on and display in dramatic fashion.  They just sit on the stands so they are always ready to be picked up and wooshed at a moments notice.

This build was so much fun.  I felt like I was back in my childhood room, digging through my big box of LEGO, looking for just the right piece to complete my spaceship.  


As always, build instructions can be found HERE.


Tuesday, December 8, 2015

UN Fountain

Let's play with some water.  My latest build is an ever-flowing faucet in the sky pouring into a small pool of water.


This build comes from another LEGO Architecture set, United Nations Headquarters (21018).
http://shop.lego.com/en-US/United-Nations-Headquarters-21018

The original model looks pretty sharp with more sideways building than you would ordinarily see in a LEGO set.

This set comes with so many beautiful light transparent blue pieces that I had to make some sort of water build.  It turns out that supporting LEGO bricks vertically is not a very stable idea.

I thought the base turned out nice.  The only visible studs are in the water which is kind of neat.  The water isn't as grand as I would have liked it to be and the faucet is pretty meh.  I do like that you can see the white pieces under the clear blue pieces pretty well.  It seems like there is come cool potential there.

As usual, build instructions can be found HERE.  I must warn you that attempting to read instructions with so many clear pieces may be hazardous to your health.

Sunday, October 19, 2014

Thar Be Goblins

My latest build be a ship full of pirate goblins:

This is an alternate build of The Goblin King Battle (79010).

http://shop.lego.com/en-US/The-Goblin-King-Battle-79010

I picked up this set on clearance a while ago and it is not my favorite.  The rope bridge is pretty cool and the Goblin King's throne is pretty nice, but the other separate island things are just weird.

I played with this set for a while trying to make something out of it.  I was thinking that there are a lot of tooth-like pieces, so maybe I can build a monster of some sort.  There's just a lot of strange pieces.  What am I going to do with these chains...and this anchor...and this wheel...and this WAIT-A-MINUTE-ITS-A-PIRATE-SHIP!

Things came together pretty quick after I decided it was going to be a pirate ship.  I gave the Goblin King an eyepatch to make him a proper captain.


I'm still not sure why this set has an anchor.

If all else fails, you can walk the plank!

The sails ended up being much better folded up.

On a scale of 1 to 10, I'd rate this pretty OK.  Overall the build is pretty solid even if the extremities tend to pop off.  I think the idea of the Goblin King captaining a ship is pretty fun.

Build instructions can be found HERE.

Monday, September 29, 2014

Police Boat

It's time to take to the water with a high speed chase between cops and robbers.  Here is the police boat:

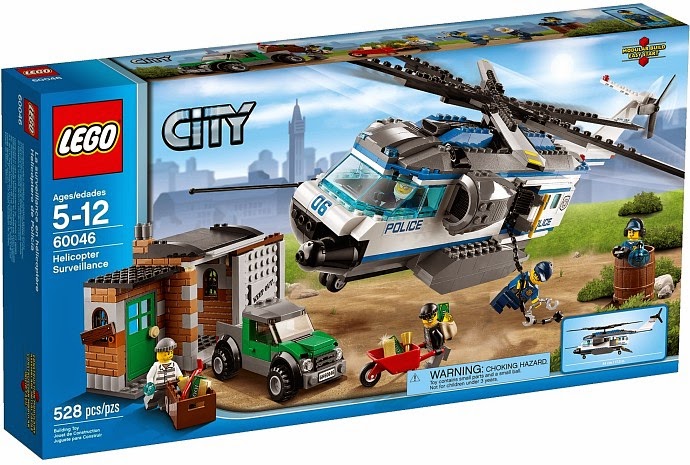
This is an alternate build of Helicopter Surveillance (60046).

http://shop.lego.com/en-US/Helicopter-Surveillance-60046

When I started looking at this set, I was drawn to the helicopter's windshield and it reminded me of a speedboat.  Doing a quick Google search came up with several different LEGO police boats.  I didn't want my boat looking like those, so I started to play with the speedboat forked front end.

Playing with things for a bit, I widened the front to break up some of the flat boxy shape the model had.  Once the front was starting to look acceptable, the back needed something.  For kicks, I threw the giant tail fin on the back.  It is quite huge back there, but I like it.

I was able to find two hinge pieces for the motors so they can lift out of the water.  The skier on the back was just fun.

So, there you go.  As usual, you can find instructions HERE.

Tuesday, September 23, 2014

LEGO Logo

I made it out to a LEGO store this weekend and got the parts I needed for this guy:

 Special thanks to the staff at the Orland Park LEGO store for helping me find the pieces that I need.

This is the logo for the place where I work.  This was done using a 48x48 baseplate covered in black 4x8 plates.  I then use an image reduced to 48x48 pixels.  For each point on the image I guestimate a lightness value between 1 and 5 with 5 being full white.  I then layer clear pieces until I get the color I'm looking for.  It ends up being a big paint-by-number.
This is a technique I saw a few times at Brickworld earlier this year.  I thought it was interesting and I wanted to try it.  I think it turned out pretty well.

Sorry no instructions for this one.  I think they would be pretty difficult to read anyway.